Wireguard
VPN verbindung zwischen Windows 11 PC und einem Hetzner vServer
Architektur
Client PC
10.20.0.2
     │
   Internet
     │
Host vServer
10.20.0.1
1. Wireguard auf dem vServer installieren
sudo apt update
sudo apt install wireguard -y
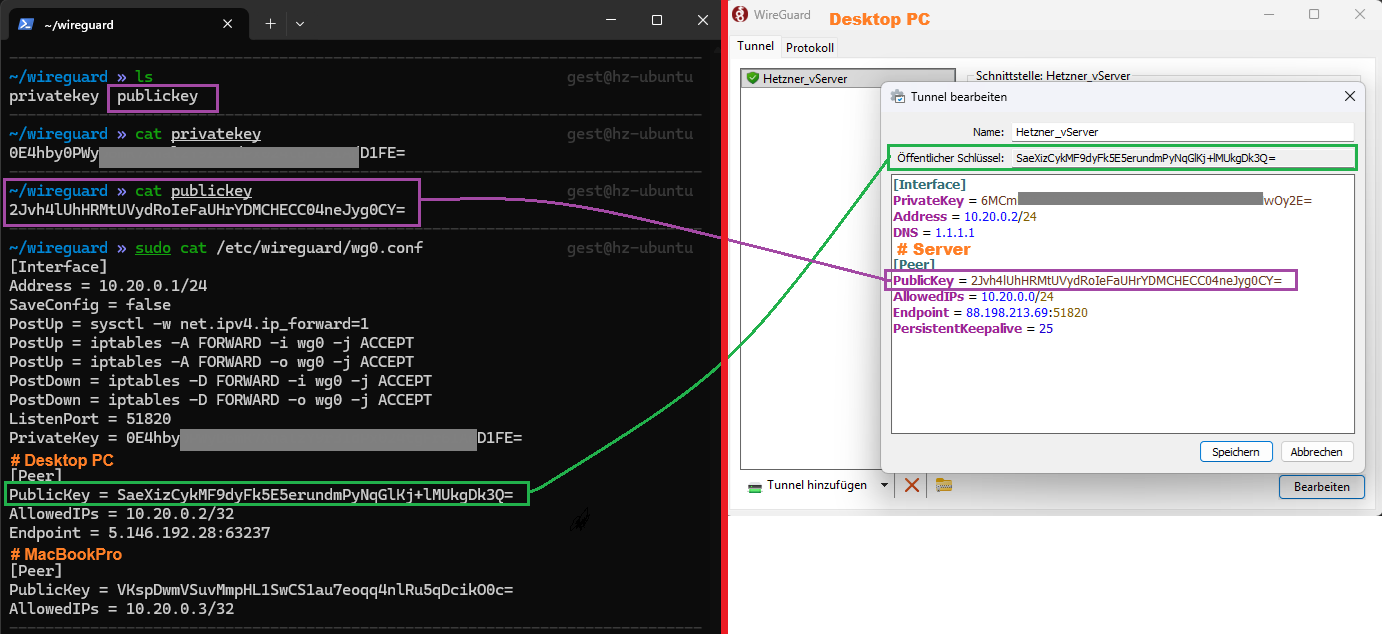
2. Server Schlüssel erzeugen
umask 077
wg genkey > privatekey
wg pubkey < privatekey > publickey
Keys ausgeben zur kontrolle
cat privatekey
cat publickey
3. Server Konfiguration erstellen
sudo nano /etc/wireguard/wg0.conf
[Interface]
Address = 10.20.0.1/24
SaveConfig = true
PostUp = sysctl -w net.ipv4.ip_forward=1
PostUp = iptables -A FORWARD -i wg0 -j ACCEPT
PostUp = iptables -A FORWARD -o wg0 -j ACCEPT
PostDown = iptables -D FORWARD -i wg0 -j ACCEPT
PostDown = iptables -D FORWARD -o wg0 -j ACCEPT
ListenPort = 51820
PrivateKey = SERVER_PRIVATE_KEY #

[Peer]
PublicKey = CLIENT_PUBLIC_KEY #
AllowedIPs = 10.20.0.2/32
4. Firewall öffnen
Bei Hetzner Cloud: -> Security Group: -> UDP 51820 erlauben
sudo ufw allow 51820/udp
5. Client einrichten (Windows 11)
Downloaden und installieren von WireGuard Neue Konfiguration erstellen: -> "Add Tunnel" -> "Generate Keypair"
[Interface]
PrivateKey = CLIENT_PRIVATE_KEY
Address = 10.20.0.2/24
DNS = 1.1.1.1

[Peer]
PublicKey = SERVER_PUBLIC_KEY
Endpoint = DEINE_HETZNER_IP:51820
AllowedIPs = 10.20.0.0/24
PersistentKeepalive = 25
6. Client im Server eintragen (Desktop PC)
sudo nano /etc/wireguard/wg0.conf
[Peer]
PublicKey = CLIENT_PUBLIC_KEY
AllowedIPs = 10.20.0.2/32
sudo systemctl restart wg-quick@wg0
7. verbindung Testen
Windows → Tunnel aktivieren
ping 10.20.0.1
Wenn Antwort kommt → VPN steht.
Hinweis zur Konfigurtion
Wichtig: Die PublicKeys müssen jeweils “gegenseitig” stimmen:
- Server [Peer] PublicKey = Windows Public Key
- Windows [Peer] PublicKey = Server Public Key
Zugriff auf Docker Container verbindung Testen
Wichtig: Bind nur an die WireGuard-IP (nicht 0.0.0.0!)
10.20.0.1:11434:11434
Test container erstellen
# ========================================#
# COMPOSE FÜR DIE LOKALE ENTWICKLUNG      #
# Ollama                                  #
# ========================================#

services:
  ollama:
    image: ollama/ollama:latest
    container_name: ollama_local
    ports:
      # WICHTIG: Bind nur an die WireGuard-IP (nicht 0.0.0.0!)
      - "10.20.0.1:11434:11434"
    volumes:
      - ollama:/root/.ollama

volumes:
  ollama:
In Insomnia/Postman endpunkt abfragen: http://10.20.0.1:11434/api/version
{
	"version": "0.16.1"
}
8. Client im Server eintragen (MacBookPro)